Table of Contents
Click any title below to jump directly to that part of the guide:
- Understanding the Trade Ticket — What it is, why it matters, and how to use it correctly.
- Preparing Your Brokerage Account — Secure setup steps and account readiness tips.
- Finding and Selecting the Right Stock — Research workflows, expert tips, and screening tools.
- Choosing the Right Order Type (and Placing Your Trade) — Step-by-step buy process and order type comparison.
- Executing and Tracking Your Order — Confirming fills, fixing issues, and avoiding slippage.
- Selling Your Shares Successfully — Exit strategies, timing, and protecting profits.
- Pro Tips, FAQs, and Final Takeaways — Summary guidance and answers to common questions.
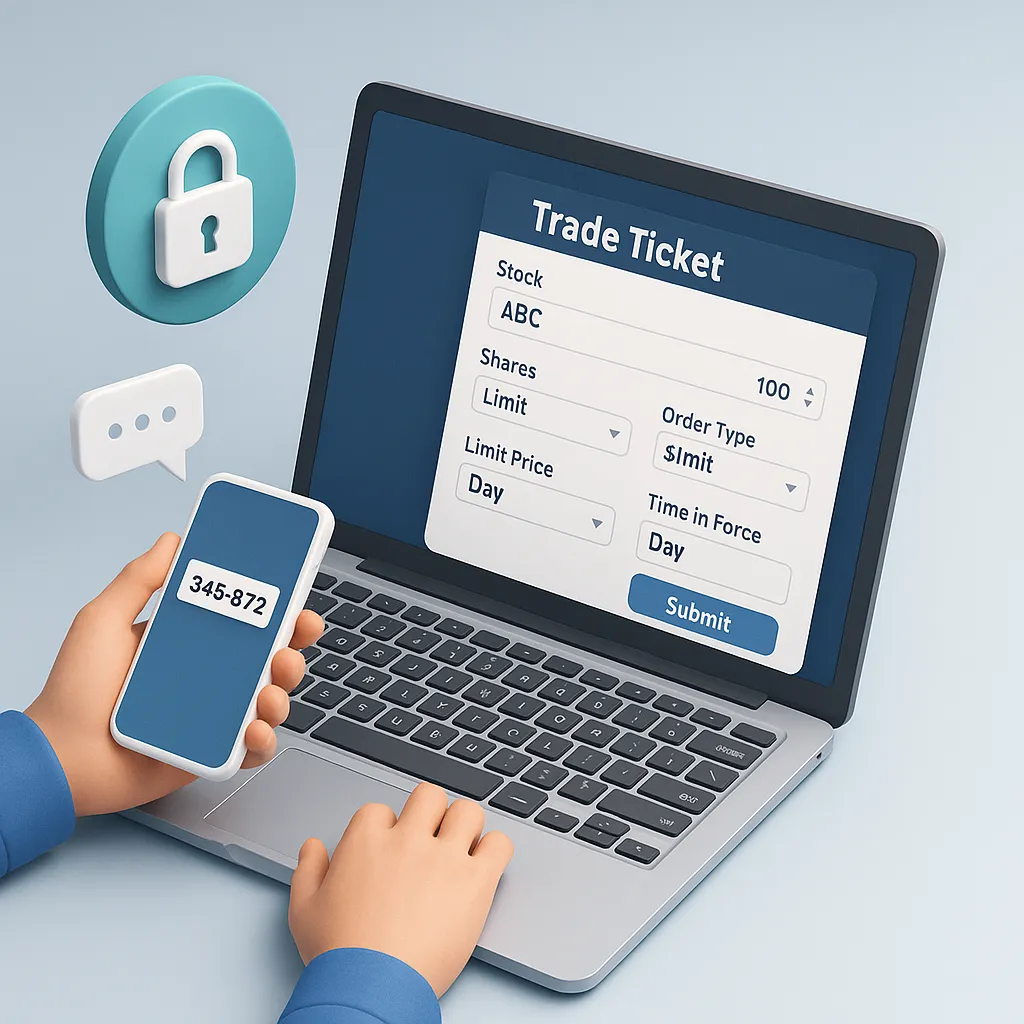
Understanding the Trade Ticket
The trade ticket is the nerve center of your investing journey — it’s the command console where you enter and confirm every detail of your buy or sell order. Whether you’re placing your first trade or your hundredth, mastering this interface is critical to making confident, profitable moves in the market.
Decades ago, traders filled out paper trade tickets by hand, often in the middle of a noisy trading floor. Today, these forms have been replaced by sleek, digital order entry screens that are faster, cleaner, and infinitely more accessible. Still, while the format has changed, the importance of accuracy and understanding has not.
Key Elements You’ll See on a Trade Ticket
- Stock Symbol: The unique ticker identifier for the company.
- Order Type: Market, limit, stop, or other specialized orders.
- Quantity: The number of shares or contracts.
- Price: For limit orders, your desired purchase or sale price.
- Time in Force: How long your order remains active.
Case Study: The Power of Order Type
In 2023, an investor named *James* wanted to buy 1,000 shares of a small-cap tech stock. If he had placed a market order, the rapid price swings could have added $0.10 per share — an extra $100 on the trade. Instead, James used a limit order just below the current price. His order filled the same day at his target, saving him $100 and improving his profit margin when the stock rose 15% a week later.
Pros and Cons of Understanding the Trade Ticket
| Pros ✅ | Cons ❌ |
|---|---|
| ✔ Gives you precision control over your orders | ✘ Requires initial learning curve |
| ✔ Helps avoid costly mistakes like buying at inflated prices | ✘ Can delay execution if limit price isn’t reached |
Before you even open your trade ticket, it’s essential to understand that owning stocks means owning part of a business — a mindset that will influence how you approach every order.
Key Takeaways
- Know your trade ticket fields before placing any orders.
- Use limit orders to control your entry price.
- Always double-check details before submitting.
Preparing Your Brokerage Account
Before you can place your first trade, you need a fully prepared and secure brokerage account. This step is often overlooked by beginners, but a properly set up account ensures smooth execution, fewer delays, and better protection against fraud.
Checklist for Preparing Your Account
- Log in securely using strong, unique passwords and a trusted device.
- Enable two-factor authentication for added protection.
- Verify your account details — name, address, tax ID — to prevent trade rejections.
- Familiarize yourself with your broker’s dashboard layout, including the trade ticket location.
Case Study: Avoiding a Costly Delay
Linda, a new trader, missed a major breakout in a stock she’d been watching for weeks. Why? Her brokerage account was still under review because she hadn’t submitted a required ID document. By the time her account was active, the stock had already climbed 20% — a painful lesson in the value of preparation.
Pros and Cons of Preparing Your Account Early
| Pros ✅ | Cons ❌ |
|---|---|
| ✔ Prevents missed opportunities | ✘ Requires time to set up initially |
| ✔ Improves account security | ✘ Extra steps may feel tedious for eager beginners |
For faster execution once you’re ready, consider signing up for day trading alerts — these can notify you of high-potential setups the moment they occur.
Key Takeaways
- Have your brokerage account fully verified before you start trading.
- Enable all available security features to safeguard your funds.
- Know your broker’s platform layout to save time when trades move fast.
Finding and Selecting the Right Stock
Great trades begin with great choices. Before you open the trade ticket, spend time filtering, researching, and validating your ideas so you’re not just buying a ticker — you’re buying a business with a thesis you can defend.
Build a Simple, Repeatable Research Workflow
- Start with clarity: Define why you want exposure (growth, value, momentum, dividend).
- Screen efficiently: Use basic filters (market cap, sector, volume, EPS growth) to narrow the field.
- Verify the story: Read filings, skim earnings call highlights, and check recent catalysts.
- Set guardrails: Decide your maximum entry price and invalidations before emotions weigh in.
Core Factors to Evaluate (Quick Checks)
- Business quality: Understand how the company makes money and what gives it an edge.
- Financial health: Revenue/earnings trends, margins, debt load, cash flow consistency.
- Liquidity & volume: Thin volume can widen spreads and cause slippage on entries/exits.
- Price action & levels: Identify support/resistance and where your trade would be wrong.
- Catalysts: Earnings dates, product launches, regulatory news, index inclusions.
Not sure which names fit you? Start by aligning picks to your temperament and time horizon with this primer on how to tell what stock is suitable for you. :contentReference[oaicite:0]{index=0}
Next, confirm that average daily volume supports clean entries/exits. Sudden volume spikes can move price faster than you expect — here’s a deeper dive on how a stock’s volume can affect its price. :contentReference[oaicite:1]{index=1}
Finally, curate ideas rather than chasing headlines. Use curated watchlists like Daily Stock Picks and Penny Stocks to Watch to focus your research time where it matters most. :contentReference[oaicite:2]{index=2}:contentReference[oaicite:3]{index=3}
Case Study: From Watchlist to Winning Entry
Setup: A trader tags a semiconductor name showing accelerating revenue and a bullish breakout base. Average volume is robust, spreads are tight, and the next earnings date is three weeks out.
Process: They bookmark two price levels: a buy zone near support with a limit order plan, and an invalid level where the thesis breaks. They also predefine a time-in-force in case the limit doesn’t fill the same day.
Outcome: The limit order fills on a mild market dip, risk remains defined, and the stock pushes to new highs the following week. The win wasn’t luck — it was the result of clear criteria and patience.
Pros and Cons of a Structured Stock-Selection Process
| Pros ✅ | Cons ❌ |
|---|---|
| ✔ Improves decision quality and consistency | ✘ Can feel slow compared to “hot tips” |
| ✔ Reduces emotional chasing and FOMO | ✘ Requires discipline to pass on marginal setups |
| ✔ Makes entries and exits easier to plan | ✘ Good candidates may still fail — nothing is guaranteed |
Key Takeaways
- Pick with purpose: Define your edge (growth, value, momentum) before screening.
- Confirm liquidity: Sufficient volume and tight spreads help you execute cleanly.
- Write the plan: Entry, invalidation, and time-in-force should be decided before price moves.
- Use curated resources: Rely on focused lists and research hubs to avoid noise. :contentReference[oaicite:4]{index=4}
Choosing the Right Order Type (and Placing Your Trade)
Now it’s time for the moment every trader looks forward to — entering the order to purchase your chosen stock. This is where **preparation meets execution**. Getting it right can save you money, protect you from slippage, and help you lock in the price you want.
Step-by-Step: How to Purchase a Stock
- Log into your brokerage account. Use a secure connection and verified device.
- Enter the stock symbol in the platform’s search bar — typically in the upper left or right corner.
- When the stock profile appears, click “Purchase” or “Trade” (names vary by broker).
- This will open the trade ticket — the digital form where you input all order details.
- Enter the number of shares you want to buy.
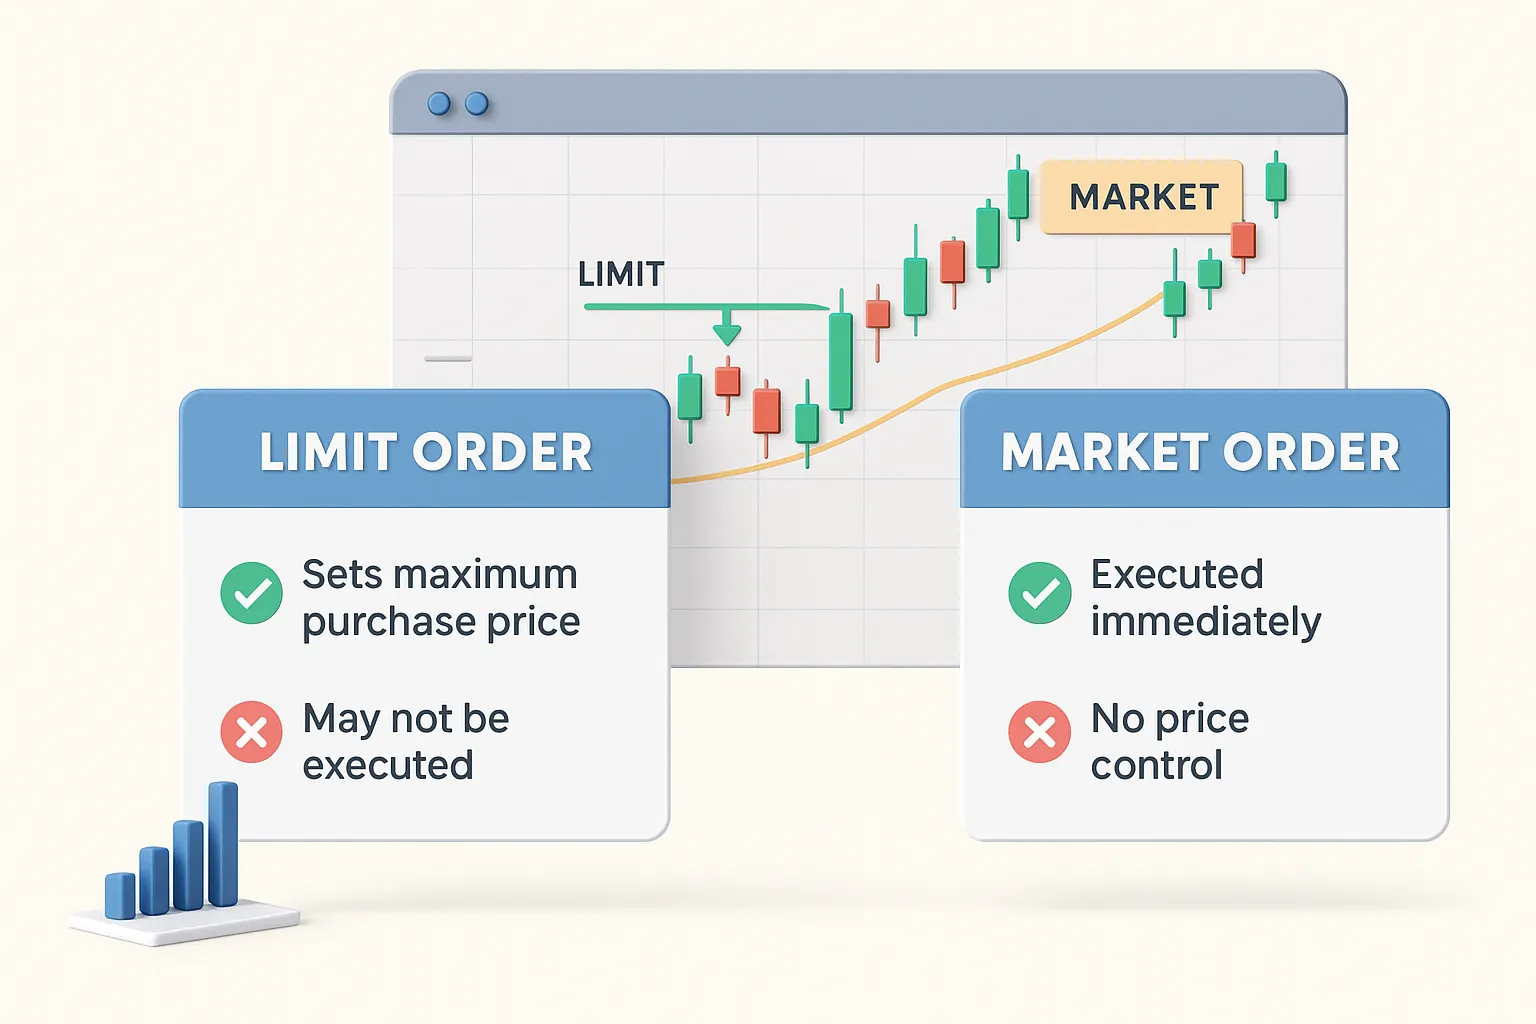
- Select your order type:
- Market Order: Executes immediately at the best available price — fastest but can be costlier.
- Limit Order: Executes only at your specified price or better — protects you from overpaying.
- Pro Tip: For low-priced stocks (e.g., $0.75–$5.00), set your limit order just a few cents below the current price to increase the chance of a fill while protecting against sudden spikes.
- Choose “All or None” if you only want the full quantity purchased — prevents partial fills.
- Select Time in Force: Determines how long your order remains active (e.g., Day, Good-Til-Canceled).
- Review all details, then click “Submit”.
Case Study: Why Limit Orders Save You Money
Mark placed a market order on a fast-moving small-cap at $4.50. In less than a second, the price jumped to $4.63, costing him an extra $130 on his intended buy. A limit order would have kept him at his target and saved that amount — enough to fund a second small trade the same week.
Pros and Cons of Market vs Limit Orders
| Pros ✅ | Cons ❌ |
|---|---|
| ✔ Market orders execute instantly in liquid stocks | ✘ Can result in higher-than-expected purchase price |
| ✔ Limit orders protect you from overpaying | ✘ May not execute if your price isn’t reached |
For a deeper dive into advanced tactics beyond simple buys, check out our guide on covered vs uncovered options calls and how they integrate with stock positions. :contentReference[oaicite:0]{index=0}
Key Takeaways
- Limit orders offer price control — crucial for volatile or low-priced stocks.
- All or None ensures you get your full intended share amount.
- Always double-check your Time in Force setting before submitting.
Executing and Tracking Your Order
Clicking “Submit” isn’t the end of the trade — it’s the beginning of execution. Whether your order fills instantly or takes hours (or even days) depends on your order type, market conditions, and the stock’s liquidity. Tracking your order ensures you know exactly when you’ve become a shareholder and that everything processed as intended.
Steps to Monitor and Confirm Your Trade
- Check Your Order Status: Immediately after submission, review the status in your brokerage’s Orders or Activity tab.
- Watch for Confirmation: A successful fill will generate a trade confirmation notice — often sent via email or SMS.
- Partial vs. Full Fills: If you didn’t select “All or None,” your order may fill in smaller chunks.
- Unfilled Orders: If your limit price isn’t reached, the order will remain open until it’s filled or expires (based on your Time in Force setting).
- Portfolio Update: Refresh your holdings page to ensure the new shares appear at the correct purchase price.
Common Execution Issues (and How to Handle Them)
- Slippage: Market orders can execute at a higher price than expected — use limit orders to avoid this.
- Partial Fills: Happens in low-volume stocks; decide if you’re comfortable holding partial positions.
- Delayed Confirmation: Check your internet connection and broker’s status page if confirmations take unusually long.
- Order Rejection: Review your account balance, buying power, and order size.
Case Study: The Price of Not Checking
Kevin placed a market order for a mid-cap stock just before earnings. He assumed it had filled, but in reality, the market gapped up 4% and his order executed at the higher open — costing him an extra $480. If he had checked his confirmation in real-time, he could have canceled and re-entered with a better price limit.
Pros and Cons of Tracking Your Execution
| Pros ✅ | Cons ❌ |
|---|---|
| ✔ Ensures you know exactly when and at what price your order filled | ✘ Requires active monitoring, especially for slow fills |
| ✔ Helps catch errors or unwanted fills quickly | ✘ Can cause anxiety for impatient traders |
| ✔ Allows immediate action if price moves sharply | ✘ Over-monitoring may lead to emotional trading decisions |
Understanding how execution works is just as important as picking the right stock. To improve timing and entry precision, explore the best indicator for swing trading and how it can signal optimal trade entries. :contentReference[oaicite:0]{index=0}
Key Takeaways
- Always verify your order has been filled at your desired price.
- Know the difference between partial and full fills — and whether your order allows them.
- Be ready to act quickly if the market moves against your intended price.
Selling Your Shares Successfully
Exiting a position can be harder than entering one. The decision to sell requires balancing profit protection with the opportunity for further gains. A well-timed exit can lock in profits and protect against reversals, while a poorly timed one can leave you with regret.
Common Reasons to Sell
- Hitting Profit Targets: Exiting when a stock reaches a pre-set gain percentage.
- Stop-Loss Triggered: Automatically selling to limit losses.
- Fundamental Changes: New earnings reports or market conditions altering your thesis.
- Rebalancing: Adjusting your portfolio to maintain diversification.
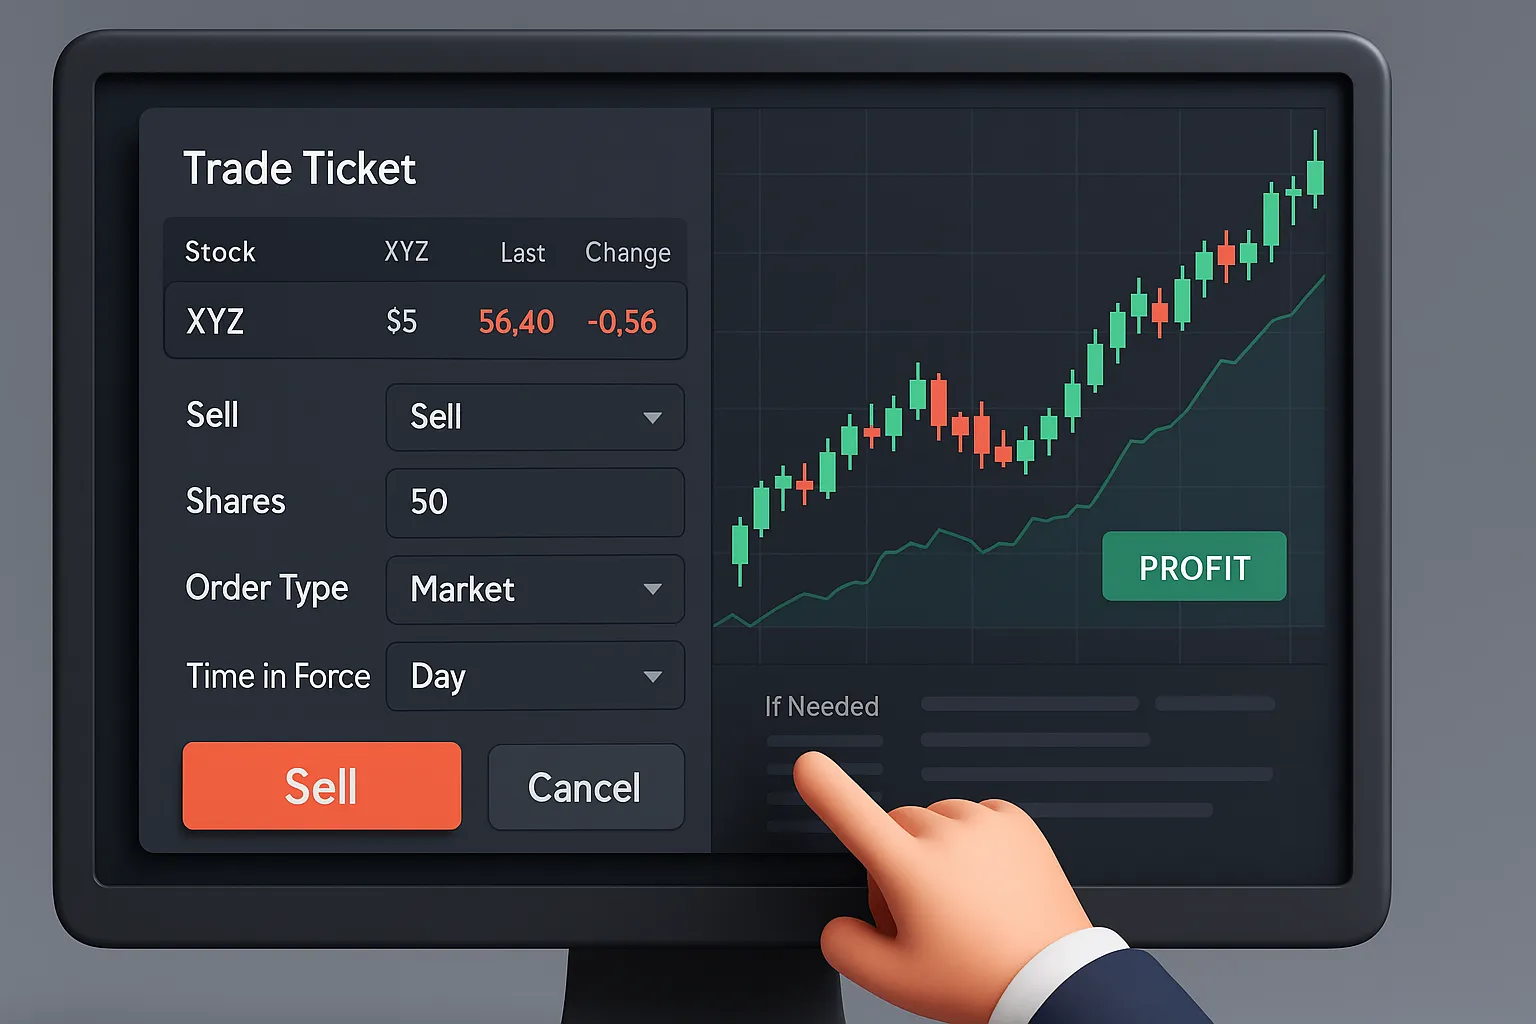
How to Sell Your Shares
- Log into your brokerage account.
- Locate the stock in your portfolio or holdings list.
- Select “Sell” instead of “Buy” to avoid adding to your position by mistake.
- Enter the number of shares you wish to sell.
- Choose your order type (Market or Limit).
- Set your Time in Force (e.g., Day, Good-Til-Canceled).
- Review and click “Submit”.
Case Study: Avoiding Emotional Selling
Maria bought shares of a retail company at $22 and set a target to sell at $28. As the stock approached $27.50, news headlines predicted a broader market pullback. Instead of panic selling, Maria stuck to her plan. Within two trading days, her target was hit, and she exited with her intended profit.
Pros and Cons of Selling Strategies
| Pros ✅ | Cons ❌ |
|---|---|
| ✔ Locks in profits at predetermined targets | ✘ Can miss additional upside if the stock continues climbing |
| ✔ Protects capital with stop-losses | ✘ Stop-losses may trigger on normal volatility |
| ✔ Maintains portfolio discipline and balance | ✘ Requires strong emotional control to follow through |
Want to stay ahead of your next big move? Monitor top stock alerts so you can spot exit opportunities before the crowd. :contentReference[oaicite:0]{index=0}
Key Takeaways
- Predetermine your exit price and stop-loss levels before entering a trade.
- Stick to your plan to avoid emotional decision-making.
- Use alerts to help time your sales strategically.
Pro Tips, FAQs, and Final Takeaways
You’ve now walked through every stage of the trading process — from preparing your brokerage account to executing and exiting trades with discipline. This final section pulls together expert wisdom, quick-reference advice, and answers to common questions so you can trade with confidence.
Pro Tips for Confident Trading
- Document Every Trade: Keep a simple log of what you bought, why, and how it performed — this is your roadmap for improvement.
- Start Small: Begin with amounts you can afford to lose while you build skill and familiarity.
- Use Alerts: Price and news alerts keep you connected without constantly staring at your screen.
- Review Regularly: Evaluate your portfolio and adjust positions based on updated research.
Key Takeaways
- Preparation is just as important as execution — set up your brokerage account correctly.
- Use limit orders to control price and protect against slippage.
- Track order execution closely to confirm fills and avoid errors.
- Plan exits in advance to remove emotional decision-making.
- Continuously review and refine your process.
Want to deepen your market knowledge? Explore our guides on fundamentals of stock market investing and stock market trading courses for actionable learning paths. :contentReference[oaicite:0]{index=0}:contentReference[oaicite:1]{index=1}
Frequently Asked Questions
What is the safest way to place a stock order?
Using a limit order with a predefined price and “All or None” condition ensures you get the full number of shares at the price you expect.
Should I start with a market order or a limit order?
New traders should start with limit orders to control costs and avoid slippage, especially in volatile or low-volume stocks.
How do I know when to sell a stock?
Set a profit target and a stop-loss before entering the trade. Sell when either is reached, unless new information changes your outlook significantly.
Final Word: Every click on the trade ticket should be deliberate. Approach each order with preparation, discipline, and a willingness to learn from both wins and losses. Over time, these habits will transform you from a hesitant beginner into a confident market participant.
Recommended Resources for Further Learning
Explore trusted sources to deepen your order entry skills, risk management, and market structure knowledge.
Official U.S. regulator guidance for new investors—credible, evergreen, and comprehensive.
Evidence‑based ideas for exits, trimming profits, and portfolio hygiene.
Exchange‑level walkthrough of order entry and execution basics.
Quickly filter by sector, volume, valuation, and performance.
Understand auctions, liquidity, and why orders fill the way they do.
Educational pieces on chart patterns, entries, and sell rules.
Self‑regulatory body tips on order risks, fees, and best practices.
News + research dashboard to validate your thesis pre‑order.